Make The Most Of A Custom Google Analytics Report & Segments
Custom reports allow you to make the most out of Google Analytics and look at statistics in ways that you hadn’t thought of before. It’s completely customizable, free to use and easy to set up. I have multiple reports set up that I can click on when I enter my GA, so that I can see the exact information that I’m looking to learn about, at the click of a mouse. This is one of the most powerful tools available to you and will teach you much more than you thought possible.
How to Make a Custom Report
When you open the custom reporting section, it can look quite confusing at first glance, but it’s not that hard when you start to understand what everything does. There are two main elements to custom reporting; metrics and dimensions. Metrics are the main statistics which you would typically study, such as site usage and content, and dimensions are the different values for each metric such as time on site and bounce rate. It’s really simple when you get started with making your own.
Firstly, you need to choose a metric that you want to work on and drag that into the metrics bar in the custom report. You can study up to 10 different metrics in one tab of a report at the same time, but if you run out of room, you can always add another tab. The metrics that you can chose from are Site Usage, which contains all the information about your visitors, Content, Goals, E-Commerce and Advertising. The last three metrics are more advanced and niched, so we won’t be going into too much detail about them. You use the drop down menus to choose which metric you want to use and drag it into the metric bar as shown below.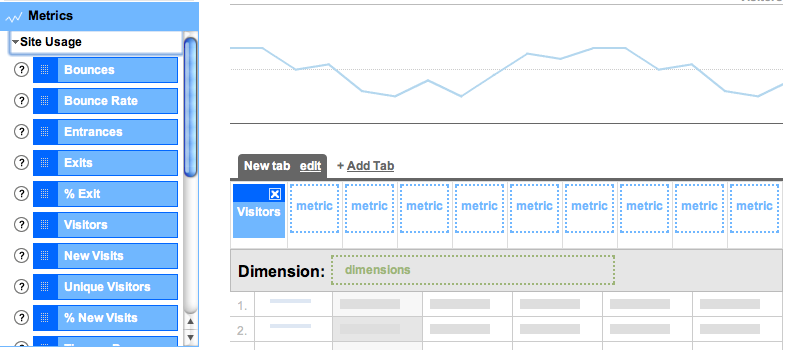
I’m going to make this report really simple to help you to understand it, so for now, I’m only going to use one metric – we’ll be looking at multiples further down this post. The next thing you’ll want to do is add dimensions to your report and that’s done much the same way as metrics, you simple drag them over from the left hand side of the page. When you choose a metric, it limits the amount of dimensions that you’re allowed to examine, so for example, when I chose visitors, I could only then look at Day, Week and Month.
Adding a dimension effectively cross references the metric to produce results. By adding Day to the metric of Visitors, I find out which days were the most popular and which days were the least popular, and I can then use this information to my advantage in the future. It basically lets you customize your Google Analytics results to provide you with information that you either wouldn’t have had before, or would have been hard to find.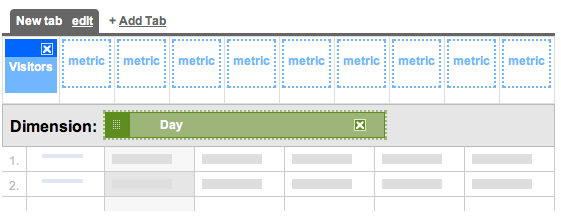
If you want to expand on this you can add further dimensions, just make sure that you add them in a sensible order. For example, I may have wanted to originally look at Day, but if I add Week below, it’s only going to show me the week that my selected day was in. So if you’re adding additional dimensions, make sure you add them in order. If you’re only looking to see which Day is the most popular then stick to the single metric, don’t try to make it more complicated because the most popular days may get lost in the Month and Week dimensions.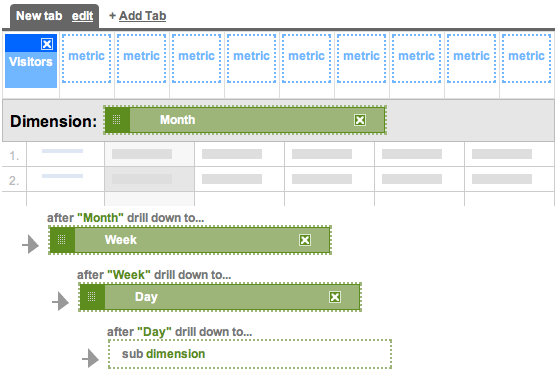
When you’ve put all of this together and click on either preview or create report then you’re taken to a more recognizable side of GA, where your results will appear. When you click on the results to investigate further, you’re provided with the next dimension, so for example, I clicked on the month of July below which was the most popular month. I’m then shown the graph for this time as well as a run down of the most popular weeks in this time. If I were to then click on these weeks, I would be taken to a very similar page, only this time it would have a run down of the days.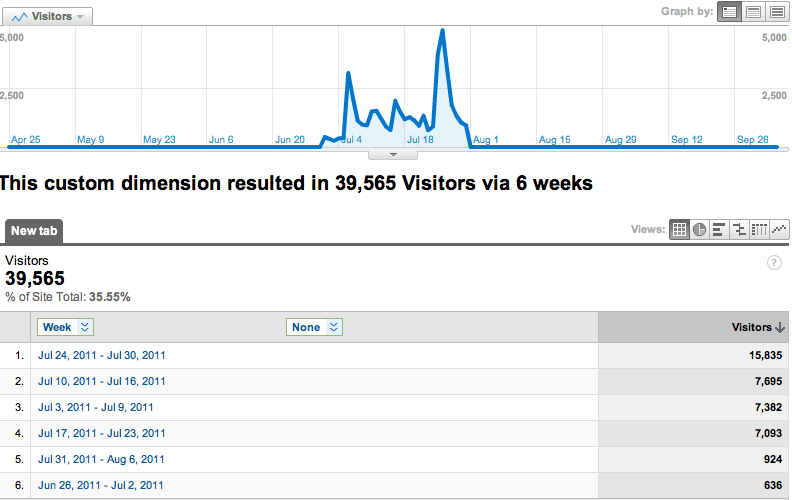
When you’ve finished with a report that you’re happy with, just make sure that you title it with a relevant name and click ‘Save Report’ at the bottom of the page. Now that we know how to put one together, lets have a look at some useful custom reports that you may want to consider making yourself.
Useful Custom Reports
The first report that I recommend that you use studies the traffic on your site in a much more detailed way, by day. To do this, I examine the number of unique visitors, visits, pages per visit, average time on site, percentage of new visits and bounce rate all as metrics, and have the dimension set to Day. The time period you select is entirely up to you; if you want to know for the current day, then the choice is obvious, but if you’re looking to see how popular your site has been over the past week then you can select longer time periods. Here’s what my report looks like, followed by the overview.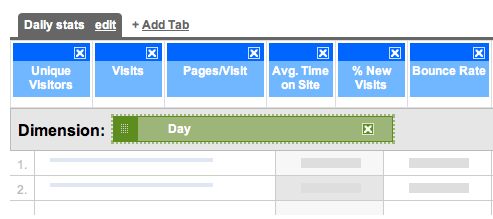
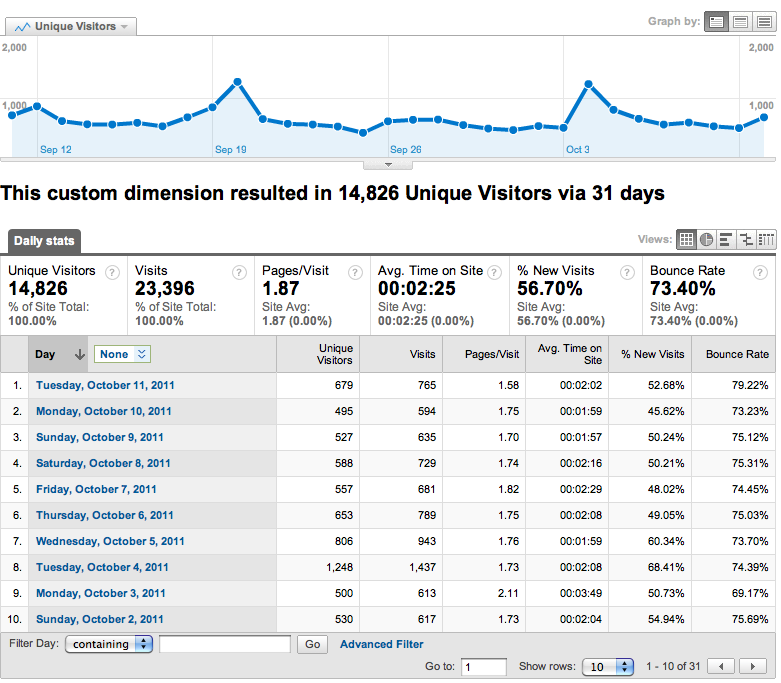
To make things really easy for you, I’m sharing all of the custom reports that I’ve made in this post, so here’s the link for the report above. One of my favorite things to look at each week is which day was the most popular day because it helps me to understand when I should post my content. Taking this a step further, I like to examine what the most popular time of day by using this custom report which examines the amount of visits broken down by the hour and arranged by their popularity. If you go one step further, you’ll be taken to the source dimension which tells you exactly where all these visitors are coming from during a certain hour.
From these two reports, I can work out which is the best day of the week to post and what time during that day that I should be posting to get the best results. I didn’t include the Hour dimension in the original report because the result would have been dependent on how popular the day was. These reports are particularly useful if you’re planning on posting a top-list that you hope will do well.
Something that GA is definitely lacking is a customizable section to look at the amount of unique visitors your website is receiving. By creating a custom report we’re able to see these results in a graph as well as look at some of the finer details about how the visitors have found your site. For my report, I’ve selected to view unique visitors and visits (for comparison) as the metrics and the dimensions as Page, Source and Keyword. Page is an obvious choice because it will tell you exactly which ones are the most popular posts, and Keyword is there to help you understand how people are finding your content. When you click on a page, it’ll take you through to the Source section, and if you click on Google, then you’ll be shown the top keywords which have taken the visitors to your site. This is always good to know as it gives you a good insight into what people are searching for and how relevant the results are. Here is my custom report – Unique Visitors by Page.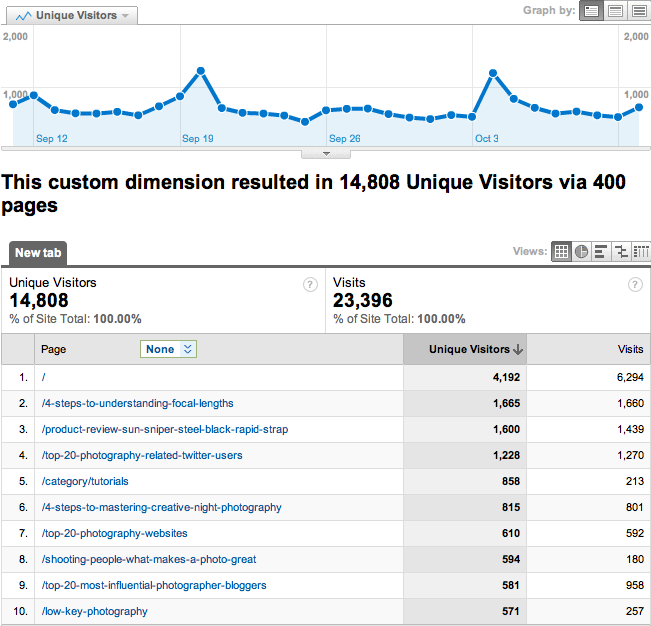
The bigger your website is, the more use you will have for some of these custom features such as revenue, and various goals that you set yourself. There’s loads of different variables you can try, so I suggest you go in and explore what works for you. Chances are you’ve been in GA before and not been able to find a statistic that you’re looking for, and quit in frustration. Custom reports put a stop to this as they open up many more answers to you.
Advanced Segments
Advanced Segmentation is a tool you can use to slice and dice your Analytics data with great precision. Advanced segments allow you to choose what types of visitors you want to be considered when generating the data for a report. If you find that you have a large amount of data but you’re having a hard time filtering the information into a report, then you can easily create your own segments and apply them to any report instead of creating different filters for each profile.
One of my favorite things to do is to track the quality of visitor that I’m receiving and there’s no better way to do this than to create and advanced segment which will filter out all of the information that I don’t want. A quality visitor for me is someone who spends over 20 seconds on the site, and views at least 2 pages. These are people who haven’t just come to visit a top list or a popular post that’s been shared on the Internet somewhere. The time factor is still relatively short, but the majority of visitors stay for under 10 seconds, so 20 seconds is still quite generous. When you look at all the factors together and press test, it’ll look something like the the image below.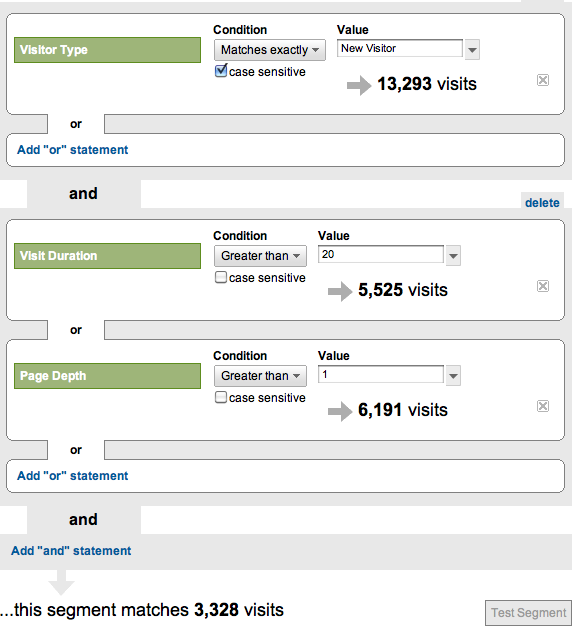
When you save your segment, you can save it and view it like any other Google Analytic result. To view it, go back into your advanced segment section and click on it, or use the drop down menu in the top right hand corner of your dashboard. It will update your dashboard with only information that fits within these parameters, and then you can carry on researching your website analytics with more accurate results. Here’s a link to the Advanced Segment.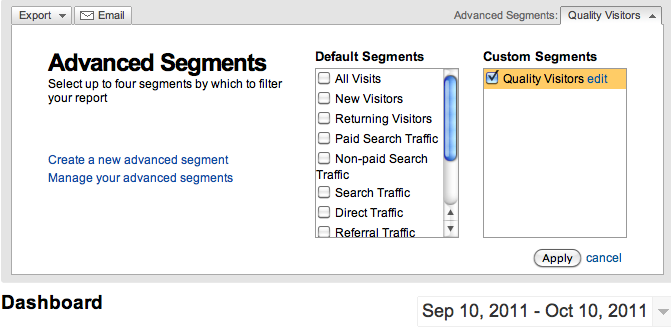
I do a lot of marketing through social media, which I suspect a lot of you do too, so it’s important for me to track my progress through these means. This is really simple, all you do is open up another advanced segment and add a list of sources with ‘or’ between them, so that the segment considers all of the results. Then make sure all of the condition parameters say ‘contain’ and then list the website name in the value box, like I’ve done in the image below. List as many sources as you wish to examine at a single time, and then save it down. Here’s the one that I use.
You can include more advanced segments such as the ones above, or keep it much simpler and only have a single parameter. I have a segment set up for Google traffic so that I can easily view my traffic from my dashboard and delve deeper into the statistics than Google previously allowed me. I have all of the information that I would typically look at, only now it’s specific to traffic that’s come from Google. This is really easy to put together, and here’s now you do it.
Combining Custom Reports & Advanced Segments
The excellent thing about Advanced Segments is that I can then use these new parameters to look more accurately at my custom reports. By using the segment on quality visitors, I now only examine the information that matters to the growth of my blog, which is the quality traffic. It will also help me to see which is the most popular content with people who are already following the website, so I can get a better idea about what they’re interested in learning.
All of this makes for a free program, that you probably didn’t realize could get even better. I use Google Analytics almost everyday and having this added functionality has really improved the quality of my results.
"Do Not Write Another Blog Post Until You Watch This Free Video..."

Watch this free video to learn...
- How I got over 10,000,000 people to visit my websites.
- The types of blog post that got me all that traffic.
- How to get someone else to do it for you!





Another great post josh. Its funny how you made a point to say your able to find the best day to post on, by looking for what day your site is most popular.
I did a similar test with social media sites and got great results.
Thanks againfor Josh for spreading the knowledge.
Nifty @Josh. I’ve used this custom report once and its stellar. Thanks for delving some more.
Is there a way to see the actual path a visitor takes on your site? So they went to Page 1, spent 0:40, then to page 5 for 0:10 and back to page 1 for 0:45 and then left?
Thanks.
I think, only visitors path is available but with no time on each page, I’m still finf some hard in finding things on Google analytics.
Thanks. Will take a look at that. Just set up some reports that will help me to figure out what users are doing on the site.
nice blog post i always look forward to reading your blog posts.
You always give the most useful information that I have read anywhere and seem to know exactly what I want to know. This is so simple yet so brilliant.
John, you are a web traffic expert, I like the tutorials on segmenting traffic on google analytics thanks
Thanks for the great info! I learned a lot. This will help me specifically look at the numbers that tell me where to improve. Thanks, I’ll definitely be sharing this one with my readers.
Hi josh,
Great post once again, i always wondered what custom reports did! The hard thing for me is getting enough traffic to get decent results from my google anaytics. Any suggestions that could help me get more traffic to my blog?
Danny
Another great post article, Josh.
I did try out the custom reports(segments)previously(after reading a post about it earlier).
I must have not done well following the instructions, as the data returned = o.
I will play around with a few of those parameters you have mentioned in your post, maybe the results will show this time around.
Another thing. I have heard quite a bit in recent times, is regarding how important it was to know your stats, as far as the best time to publish posts is concerned.